Introduction to Hyper-V - What It Is and Why You Should Use It
Welcome to Chapter 1 of our comprehensive series on Hyper-V! In this video and blog post, we’re covering the basics of what Hyper-V is, why it’s a great tool for virtualization, different editions, system requirements, and how to enable it.
By the end of this post, you’ll have a solid understanding of the fundamentals and be ready to dive deeper into Hyper-V in the next chapters.
What is Hyper-V?
Hyper-V is a virtualization technology developed by Microsoft. It allows you to create and manage virtual machines (VMs) on a single physical host. Each virtual machine can run its own operating system and applications independently, just like a physical machine.
Key Benefits:
- Resource Optimization: Run multiple VMs on a single server to make better use of your hardware.
- Isolation: Keep each VM separate, so problems in one won’t affect others.
- Testing and Development: Perfect for creating isolated environments for testing software.
- Disaster Recovery: Simplifies the process of backing up and restoring critical services.
Why Use Hyper-V?
There are several benefits to using Hyper-V in your environment:
- Resource Efficiency: You can run multiple virtual servers on a single machine, maximizing hardware use.
- Cost Savings: Reduce the need for additional physical servers, saving on hardware, maintenance, and energy costs.
- Testing Environments: You can quickly spin up test environments to try out new software or configurations without affecting your live servers.
- Business Continuity: Hyper-V makes it easier to maintain services during hardware failures through quick migration of VMs.
Hyper-V Editions
Hyper-V is available in multiple editions to meet different needs:
- Windows Server Hyper-V: Full-featured virtualization available in Windows Server editions like Standard and Datacenter.
- Windows 10/11 Hyper-V: Available in the Pro, Enterprise, and Education editions, and is often used for development and testing.
System Requirements
Before enabling Hyper-V, you’ll need to ensure your system meets these basic requirements:
- 64-bit Processor with Second Level Address Translation (SLAT).
- At least 4 GB of RAM (though more is recommended for running multiple VMs).
- Virtualization enabled in your BIOS/UEFI settings.
Software Requirements:
- Windows Server (2016, 2019, or 2022) or Windows 10/11 Pro, Enterprise, or Education editions.
How to Enable Hyper-V on Windows 10/11
Enabling Hyper-V is straightforward, and here’s how you do it:
- Open Control Panel.
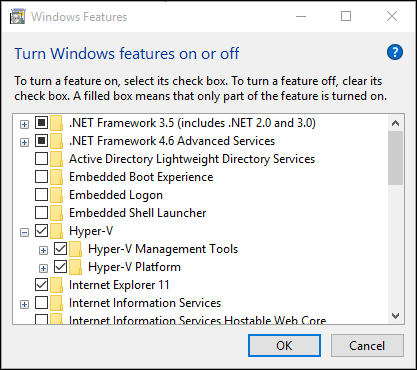
- Go to Programs > Turn Windows Features on or off.
- Scroll down, check the box for Hyper-V, and click OK.
- Restart your computer to complete the process.
Once your system reboots, you’ll be able to open Hyper-V Manager and start creating virtual machines.
How to Enable Hyper-V on Windows Server
For Windows Server users, enabling Hyper-V is a bit different:
- Open Server Manager.
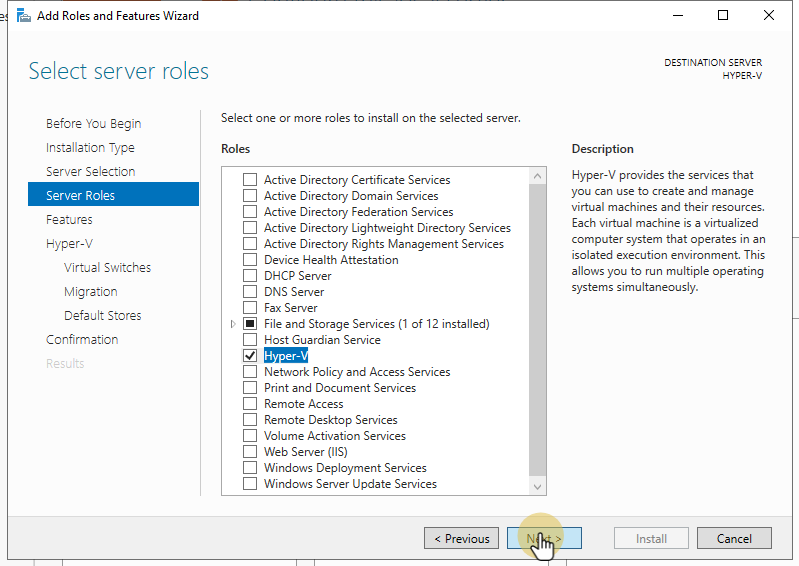
- Click Add roles and features.
- Follow the wizard to install the Hyper-V role.
- Restart your server after the installation is complete.
Getting to Know Hyper-V Manager
Hyper-V Manager is the main tool you’ll use to create and manage virtual machines. It allows you to:
- Create new VMs.
- Modify VM settings (such as CPU, memory, and storage).
- Monitor VM performance and resource usage.
To open Hyper-V Manager:
- On Windows 10/11, search for Hyper-V Manager in the Start menu.
- On Windows Server, open Server Manager, go to Tools, and select Hyper-V Manager.
Want the Full Written Guide? Get Early Access on Ko-fi
If you’re finding this series useful and want to dive deeper into Hyper-V, consider supporting our work by getting early access to the full written guide on Ko-fi! You’ll get a comprehensive, step-by-step guide covering everything from beginner to advanced topics in Hyper-V. Plus, your support helps us continue creating and improving content.
Head over to Ko-fi to download your copy today: Get It Now on Ko-fi
Conclusion
That’s it for Chapter 1: Introduction to Hyper-V! You should now have a good grasp of what Hyper-V is and how to enable it on your system. In the next chapter, we’ll dive deeper into creating your first virtual machine in Hyper-V.
If you found this post and video helpful, don’t forget to like, share, and subscribe to our channel for more tutorials. Stay tuned for the next part in our series, and feel free to drop any questions or comments below.


